2013-03-07

I set up the settee table in the main cabin to try to get a feel for the original Craftsman layout. I am sure the boat crawl at the Nor’sea 27 get-together will help crystallize some ideas about which way I want to go with the interior.

The prior owner had installed a couple of cleats and extended the side settee into a wide berth, similar to what Curt did on Journey, but without the fine polish in materials and the convertability.  It was easy enough to take out as the board was just held in with a few screws.  I did find that most all of the trim pieces, fiddles that hold the cushions in place were no longer on the boat.  I just had a short 1′ section, but that gave me a template to use when I make a trip out to Blue Pelican to see if I can find more material.

Next I installed the table, which rides on a big steel clamp attached to the compression post. It’s an awkward arrangement using thumbscrews to clamp the post.  Lots of little dings from every time it has been moved or installed.  It would have been easier to use and much less destructive if they used an overcenter clamp and some delrin or something.  The really surprising part was when I had the table installed I expected it to drop right onto the settee and fill in the space much as the temporary board had done.  this is how any modern RV works, but the table is slightly too large to fit the area, the cushion fiddles would probably have further obstructed it, and its own fiddles create clearance issues.  It’s clear I could optimize this arrangement somewhat.  However I found a really nice Lagun table on eBay that may obviate all this and give me a table that can be used in the cockpit or saloon.

I plan to make a trip over to Ikea just to look at what kinds of materials and cushions they have so I can see what I like by way of interior upholstery.  That’s a separate issue from the layout aspects.

2013-03-16 Dismasting!

I actually  mean removing the mast from the boat, not losing the mast at sea, if you were concerned!

After cogitating on this for some time I decided the most straightforward place to put a 35 foot mast is on the roof of the garage.  It seems to be a lot easier to shuffle it off the boat onto a few sawhorses spanning the ridge of the garage roof than it is to lower it to the ground and then try to lumber it around the yard, creating a big storage nuisance and knocking over things.

The first step was to clear all of the running and standing rigging.  The mast wiring had (unfortunately) been cut at the tabernacle because the yard monkeys couldn’t get the bolt out of the tabernacle.  They also found it more expedient to clip the tabernacle bolts than to unscrew them.  Anyway…

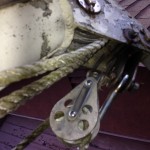
There were three halyards running through the mast sheaves, which I labeled A B and C.  there was also a fourth loose block which was connected to the front of the masthead and moused with stainless wire.  I believe this was for at the front of the mast.  The A and C sheets were run through the masthead in the same direction. The B sheet went the other way.  I don’t know at this point which was which; it could be that B was for the foresail and A and C were Mainsail and topping lift or something.  Or maybe the topping lift was wire.  I have to look at my old photos and see if I have any details.

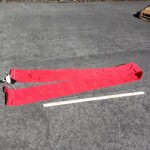
All of the sheets are in miserable condition, but I asked the yard to save them so I would have an idea what lengths and sizes I would need.  At least two of them are rope as opposed to any kind of yacht braid.  I got the two halyards that were wrapped around mast cleats loos and ran them one a time through the sheaves after labeling them.  They can only fit through one way because of the splices being bigger than the sheaves.  I also have a shackle for each.

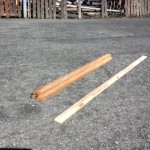
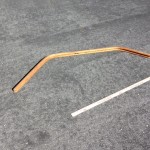
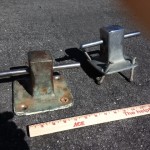
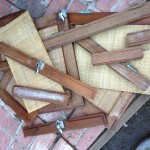
After bundling, tagging and zip tying the lines I stowed them away in the aft cabin and moved on to the standing rigging. I had already removed done of the spreaders prior to the trip so I had just one to deal with. It’s something under an inch at the bolt size. I loosened the bolt and we were able to work out the bolt/spacer combination, but the spacer is hopelessly welded to the bolt at this point, so this looks like more hardware that will need replacement.  I got the spreader off and stored away.  I have the 1″ round spreader poles which I must replace based on their condition. I’d like to replace them with aerodynamic foils.  Curt on Journey used new poles and mounts of the original type and ran a wood pole through the pipe to keep them from crushing.  I bought two nice spreaders foils Craigslist for $65 but would need to find a way to mount them.

The lines to the spreader tangs were loose so those were coiled, zip tied and stored away.  The lines to the upper tangs had to be loosened and removed. The forestay and rearstay lines were removed and coiled.

I believe I have this arrangement of eight wire ropes:

  • 1 forestay to the masthead
  • split rearstay to the masthead
  • 6 sidestays
    • inside pair to up the spreader boots to the masthead
    • front pair to coupling at the spreader tang
    • rear pair to coupling at the spreader tang

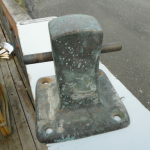
The four stays at the masthead were removed by taking out the cotter pins and pushing out the bolts.  The nut came off the sidestay but I couldn’t turn the bolt so I had to remove the spreader wires from the tang as opposed to taking off the tang.

The antenna was zip tied down tot the mast.

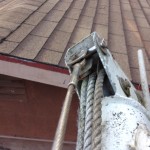
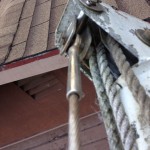
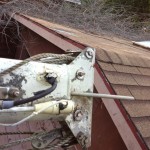
Free of wire and lines the mask wasn’t unbearably heavy but was rather floppy.  Carlos went over to the garage roof and we slid the mast aft about 6 feet to reach him then walked it out about halfway.  it became clear he’d need some support on his side as the mast weight increased, so I passed over one of the blocks, which held the mast temporarily while I went to get the sawhorses.  I passed all three, one at a time up to him.  We arranged the sawhorses across the roof ridge so they were level and got the mast completely off the boat onto the roof of the garage.  The center sawhorse sat about an inch lower due to the roof angle, so we blocked up that an inch with a wood block.  Then we tied the mast to each of the sawhorses to keep things stable.


2013-03-17 Instruments

I met Deano in Antioch and bought a few odds and ends from him.  A ships wheel, two bronze 8″ bronze ports and a couple of gauges. From the ad:

  • BRASS STOCKBURGER CLOCK AND BAROMETERTHE CLOCK MECH HAS BEEN UPDATED WITH A BATTERY OPERATED UNIT
  • ANTIQUE  SOLID BRASS 8 IN PORTHOLES
  • WOOD AND BRASS BOAT WHEEL INC KEYWAY

MAKE ME A DECENT OFFER AND THEYRE YOURS! I WILL LET THIS AD RUN FOR THE DAY AND ALL ITEMS GO TOO THE HIGHEST OFFER! THESE ITEMS CAME OFF OF A 1926 CINNO BROTHERS YACHT! SO THEYRE CLOSE TO 100 YEARS OLD IF INTERESTED CALL DEANO 925-238-XXXX


I polished up the humidity meter quite a bit with some 225 general purpose sandpaper.  It actually “cuts” less than 500  carborundum paper, which I followed with 1000, then Brasso .  It’s too bad about the clock being converted to digital.  It works and looks fine but the mechanical version had Ships Bells.  I found on eBay they have an electronic movement that has a ship’s bells feature for $130.   I may look at getting one of those if it fits the bezel.

In vintage new condition I see the clock and humidity gauge pair on a Canadian website for $899.

New Stockburger gauges new are about $75 or so but much smaller.

http://www.all4boat.com/shop/navigation-and-guide/guide/nautics-precise-appliances-2.html?v=128

2013-03-17 At the Boat Wrecker

Today I met Dan in Pittsburg, CA. He’s actually a boat wrecker and probably a good contact for the future.  He had two trailers full of Chris Crafts chainsawed into strips, so there wasn’t much in the way of straight lumber and most of it was covered in two plies 3/4″ thick.  There were some big chunks from the transom but they were oddly shaped.

The trip wasn’t a total bust –  I did get several nice varnished mahogany trim pieces 6-8′ long, 4 inches wide and just under a quarter inch thick, a small bundle of teak trim and those may be useful down the road for some purpose. Also to round out the deal he threw in a teak louvered companionway accordion type door with drink holders built into the base.  At least I think they’re drink holders.  They are a pair on both the inside and outside of the hatch so I don’t think they’re for poles!  Maybe it could fit the aft companionway, but that’s a tight squeeze as it is without having to dodge things.

Most of the leftovers were firewood.

2013-02-22 Meeting Vela – a new Jib

I was amazed today to see and advertisement for a Tanbark Jib sail appear on Craigslist, and doubly so because it was for a Nor’sea 27!! Answering the ad, I met up with Bryan, the (relatively new) owner of Vela. Vela spent 16 years in storage in the northwest and its interior is in near perfect shape. Bryan’s spent some time updating the boat, replacing all the standing rigging adding Amsteel lifelines and proper bronze through-hulls.

Stepping aboard Vela at the Richmond Yacht Club was like entering a time machine. It’s a rare opportunity to see a “new” norsea in fantastic condition. The Yanmar 2GM had less than 100 hours on it. Bryan mentioned that at his last haulout when the 2 coats of bottom paint were stripped, folks were asking if his boat was new!

The boat’s a newer 80’s layout that has pristine teak inside and out.  Bryan’s setting off for Mexico in the next week or so, so this was a serendiptitious opportunity. Oh, and I did buy the jib, and expect to put it to great use when my own projects are completed.

2012-02-16 Minney’s Yacht Surplus

I made a trip to Minney’s in Costa Mesa on Saturday and brought home a haul of goods.  I took a wish list with me that had all the critical dimensions.

  • Two teak hatch covers $75 each. These mesaure abotu 36×30 but are parallelograms, not square cornered hatches.  I have a plan to square them up at the cost of just a couple of inches of length.  Hopefully they aren’t glued too well!
  • Manual Vertical Capstan Windlass.  The windlass was $95 and the Barient winch handle was $28
  • 2 Yanmar manual starter cranks.  I bought one last visit for $3 but it turned out the inner diameter was too small.  These are definitely larger and a couple of different lengths, too.  Each was $3.
  • Companionway doors.  These are light but really well made and feature some integral removable screens and glass panels.  One glass panel is missing and the bottoms were roughly cut.   The kick is that the width was just about perfect – 11.5 inches.  They’ll need to be cut to length – about 25″ and radiused anyways.  The best part was the price $21 each!
  • four bits of pull-apart perko hinge I can use on the door, they were priced $3 but they were thrown in.
  • A water faucet for $12.  I’m hoping that I can open it up and replace the leather valve.
  • Cole stove with stack.  This one is similar to the one on Jules but came with a 3″ stack that has a damper.  it’s a little larger in the frame and has a side deflector.  Perfect  for Oz – $145
  • The coup – two bronze bollards for $16 and $48.  Check out the price over at.  Basically these went for the price I would have paid for shipping on “the one that got away” over on eBay
  • A hatch prop for the forward cabin $12
  • A bag of miscellaneous teak stuff for $20 and another Teak Handrail bit for $12
  • A wooden teak & holly cutting board for $5
  • A red bag about 8′ long that I think will make a nice tiller cover

They had a good price on a Hille-Range propane oven but it was looking a little tired and the door had some rust through on the inside, so I held off hoping Craigslist will turn up another Origo 6000 or Force 10 oven, or something similar.


On the way out we stopped in Long Beach to stop at the Captains Locker, which I was hoping was another consignment place but it turned out to be a well stocked boat supply that sold only new items.  On the way out though I checked out the West Marine at the same harbor to see what they had in the discount section, and there I found a 6″ nickel plated bell, new for $5.17.

2013-02-09 Yanmar 2GM

After finding this ad on Craigslist, I contacted the seller, Ronnie Simpson right away.  I met him on Wednesday, looked over the motor and made him a cash deposit of $300.  I found out a lot of impressive information on Ronnie over the next few days.  He mentioned he had singlehanded in the Transpac to Hawaii, but he didn’t mention that he had one his class.  I also found he was active in the Bay Area Disabled Sailor (BADS) group, and was a wounded veteran, having been injured by a rocket propelled grenade blast that left him legally blind.

Ronnie and I met on Saturday at his cruiser boat, a Cal 2-27 berthed in Alameda.  We spent most of the day pushing the engine out through the small access port in beneath the galley, then up through the companionway using a hoist connected to the boom, and we plopped it on a dolly.  Ronnie had the engine fully disconnected when I arrived, but we wound up having to remove most of the motor mounts, the alternator, starter and fuel filter before we could get the motor free.

In the course of removing the starter we found the reason for the grinding noise was that the starter housing had basically exploded.  The hope was this was the extent of the problem and a new starter might get the motor back on its feet.  Ronnie also mentioned that the engine did leak oil and suggested at least replacing its seals.

We loaded the boat into my 2000 MPV van.  We had to dump about $50 worth of diesel in the recycling because it was sloshing around too much.  I came away with a nice Racor fuel filter, a raw water filter, 10 gallon aluminum tank and filler, as well as the electronics harness and panel for the Yamar 2GM.  Ronnie’s going to work with a diver to get the driveshaft and propellor out and then contact me for pickup.

2013-01-27 Cabinet Catches

Looking over the cabinet hardware after installing the reassembled cupboard doors, I found the latch hardware was pitted with peeling chrome.  Unfortunately the material appears to be chrome on zinc, not brass, so there isn’t much hope for restoring it to any kind of shape. I did a fair amount of internet research and determined that the latches are manufactured by Perko and this is the 3/8″ offset version because the catch mounts on the frame of the cabinet carcass, which is a fraction of an inch below the non-flush door.

Pricing varied pretty widely but I did locate a place that had them at just under $20 a set.  This was just before West Marine changed its price matching policy, so I was still able to get them to order up a dozen for me.  Seven were available immediately and I had to wait about ten days to get the balance.

2012-01-20 Fireplace

The Cole fireplace is a solid fuel burning furnace designed for use with solid fuels like wood, wood pellets, charcoal or even coal (although I heard a strong recommendation to use bituminous coal rather than the other kind that smokes a lot).

It’s a simple construction with a two drawer ash tray beneath a firebox and metal grate beneath.  By sliding out the drawers or sliding up the damper on the front you can adjust the draw and combustion rate.  The exhaust port is on top, a 3″ circular port to mate with a 3″ circular flue duct.  I found flue was a little long.  This was kind of strange because it must have fit at some point.  It may be that they had the elbows adjusted for more acute angles.  I adjusted them to get as smooth a transition as possible.

In any case I cut it the flue down to size with some tin snips and set up a fire to test it.  I built the fire in the drawer which turned out to be the ashbox, so it didn’t draw well.  When I found and installed the grate and built the fire up higher I had a much better draw and the bits of wood burned very nicely.

The stove heats up quite a bit. The original installation had the fireplace surrounded by 2″ square tiles.  I’ll probably go with some 4×12″ floor tile I found at restore that is teak colored wood grain planks.  For my test I put the furnace on top of some tile coasters and kept the heat low.

2013-01-19 Reassembled Cabinets

After spending a few days organizing materials from the boat I found a pile of door materials in the aft cabin that were reassembled into doors for the galley and anchor locker.

The cane-faced doors were designed for improved ventilation over solid face frames.  The wood will need refinishing but the cane was in fairly decent shape for its age.  I was able to pair up the materials into doors and panels and other than a few chips and dings, nothing was really missing.

I used Gorilla Glue (a water resistant polyurethane) to glue the doors and clamped them with some bar clamps from harbor freight.  The glue is somewhat flexible and waterproof but not very strong.  I think a better choice would be Titebond III or the similar Elmer’s Wood Glue Max for a couple of reasons:  they are stronger glues and the glue doesn’t swell up and blow apart the joint as much.