2012-12-13 Update – a Fan and some WM Gear

Boat Stuff

I found a nice ventilation fan at Restore today for $8.  They also had a bar sink faucet for $12 that may work well in the main cabin, and a Stihl 12″electric chainsaw for $30.  I found I could get a new one with a warranty for $50, so I passed on the saw.

West Marine Sale – West Marine is having a $20 off on $100 purchase today, so I picked up an anchor rode bucket, a tide watch, rigging knife and some Cap’t Tolley’s Creeping Crack Cure  that I thought I might try on Lilikoi.  Does it work? I don’t know yet but you have to love the video!

Insurance Update

BoatsUS sent me an email today with a PDF telling me that I needed to complete the survey soon to keep my policy active.  However, considering I don’t have the boat in the water and don’t have plans to do so in the immediate future, any survey wouldn’t be able to assess things like the standing / running rigging, engine or seaworthiness.  I called them to ask about deferring the survey until I spring and they suggested we revise the policy for storage only, and I’ll need to complete a survey before I splash the boat.  Fine by me – the boat isn’t going to sink in my driveway!


2012-12-13 Paint:Easier Treatment for Water Damaged Wood?

In reviewing some photos of other boats I it occurred to me that instead of being varnished wood, the cabin ceiling could be painted white, and this would address some of the water stains and simplify the restoration after the leaking deck hardward has been rebedded.

Wood putty and paint could be used where it would otherwise have been necessary to strip out and replace a lot of the finish material.  It’s quicker, less expensive, and the resulting white ceiling would have a lighter, more open feel.  I will need to give this some thought because I really do like the look of the wood cabin top.

2012-12-12 Pumping out Diesel

Tonight Melissa and I pumped out the contents of the boat’s leaking aluminum fuel tank into five 5-gallon buckets. We harvested about 23 gallons. The first 20 were relatively clean and the last 3 came from the sump, so there was a lot of dirt, as well as the motor oil I let fall in there while removing the engine’s oil pan. Note to self: don’t ever do that again! Motor oil makes diesel look like honey! And, rather than mix freely with the diesel, it seems to float on top as a muddy goo.

I pumped from the white, plastic port on top of the tank, down through 25′ of clear 0.5″ tubing out the companionway and down the 7′ ladder to a small Harbor Freight fluid transfer pump connected to a short hose and the bucket.  It took about 200 pumps to fill a single bucket.  A drill pump would havd been handy, but tonight was intended as a dry run to see if I could pump that far (five feet up, seven feet down) without problems.

Anyways, the pump-out went pretty well, but when the flow slowed I had to remove the tubing from the tank and put a 3′ long, 1/4″ dowel inside it to keep it straight enough not to suck air. That worked pretty well until the tank got close to half full, and the hose fit too tightly and was creating a vacuum I had to work against. I pulled the hose out a few times to unlock the vapor lock, but disconnecting one of the tank fittings would have worked, too.

After the water and diesel had been pumped from the sump, the next layer was oily mud that coated the bottom and sides. I used a half roll of paper towels to clean out the crud, and sprayed in a lot of Formula 409 and left a rag overnight to sop up more of it. I am not entirely sure the bottom of the sump is really the bottom;  I see a piece of wood and some kind of float switch down there. It might go another 3-4 inches below the board.

Now, five orange buckets line the driveway, and I am hoping to find somewhere that will accept them for recycling before they start to leak!

2012-12-12 Update – The Cabin Layout

Rain

I woke last night, just after midnight, to the sound of a thundershower.  I pulled on a jacket and ran out to close up the Nor’sea: six ports, two hatches, rear drop boards and close the main companionway doors.  The main doors actually closed shut with just a little effort, which was interesting because they had been unable to close fully since I picked up the boat last month.  Something seems to be stabilizing or un-swelling, which is good.

Deciding on the Main Cabin Layout:

I went through some photos of Plume today to get an idea how significant a redesign of the original Nor’sea interior would be, and it actually looks do-able.  If I get some basic measurements I may even be able to pull off a reasonable facsimile of the newer interior.  With some minor differences I will point out, the original interior forward of the compression post was pretty similar to the new one.  The differences are primarily forward.

Removing the Nav table that occupies the port side of the original layout:  It’s a different era of navigation, and unless you are a luddite, the time spent at the sit down chart table is pretty small. You’re more likely to be in front of a laptop, or perhaps even in the cockpit with a tablet or GPS Chartplotter.  Paper charts certainly have their place but dedicating a significant portion of the interior to one simply no longer makes sense.

Replacing the fold down V-berth extension with the dual Settee creates a much more open design.  Some cruisers are very fond of the fold-up because it lets you leave the bed in place indefinitely but there is a big difference in available space.

Going with the new design would mean

  • stripping out the Nav Table (almost definitely),
  • raising the sole (probably)
  •  stripping out the existing bunks to relocate them (potentially – I need to do some measurements) and
  • rebuilding the bunks and adding the storage cubbies beneath.
  • some changes to the chain locker forward (maybe)
  • Adding the overhead storage (as on Plume makes a lot of sense.)
  • New cushions.  Fortunately, as the case may be, the prior owner discarded all his cushions, which had mildewed.  I was able to get a secondhand set of cushions from Dan, Marilee’s owner and these are for the more modern layout.  He does have a aft cockpit, so there may be some differences.
  • Settee table will need to be redesigned.  I need to look more closely at the existing table vs. the newer one and what I can do to either adapt the existing table or something available commercially.

Cost wise it might be

  • $150 for some teak and holly sole material, another
  • $150 for a 4×8 sheet of teak marine plywood,
  • $100 for a sheet of marine plywood for the deck and cubby lids
  • $200 for teak material for the overhead storage bins
  • -$1000 for being able to use the cushion set I already have

Negatives:

  • Some loss in headroom. Probably 4″ or so, but I’m not that tall!
  • Higher short term cost

Positives

  • Better resale value
  • New sole, clean and wider
  • More storage, under the sole and in the overhead cubicles
  • More modern, open design
  • The cushions I have will fit almost perfectly.  This offsets the costs above.
  • Opportunity to insulate all around during construction
  • lower long term cost

2012-12-11 Update – Diesel and Trailer Supports

Progress has been a bit slow as we had a general cleanup project for an property appraisal for a bank refinance, and we’ve been hampered by weather. Things should pick up a bit, however.

Next on the project list is to get the diesel fuel out of the tank.  It’s clear that the tank is leaking.  I pumped out the sump a couple of times last week, and each time the bilge slowly refilled with diesel after a couple days.  Then there was the fiasco with the motor that required that I drain the engine pan, and that might as well go in the sump, too!

I bought six 5 gallon orange buckets at Home depot, for $3 each, and lids for $2, and a length of 25′ 1/2″ OD hose to extend the length of the fluid transfer pump I got at Harbor Freight some time ago.  My plan is to use that to start a siphon with the buckets down at the ground level.  That way I don’t have to carry buckets of sloshy oil up the companionway ladder, across the cockpit and down the 7′ ladder.  We do learn – slowly but surely.  I’ll need to take the plastic inspection port cover off so I can tell how much oil is actually there.  Then I’ll need to see if the recycling center will take the stuff. If not we can maybe have a big bonfire for the 12/21/12 end of the world Mayan festivities.

This is a prelude to the tank removal, which is the big job for Nor’seas.  Right now my interest is primarily in getting the stinky, flammable stuff out of my work environment.

Trailer Support

Another important task is getting the weight off the trailer wheels.  I located some Railroad ties at a nearby Home Depot.  They measure about 7×9″ x 8 feet, and weigh about 160 lbs each.  I have some help coming Saturday to take this one on.

The reason for the supports:  A Nor’sea weighs in the neighborhood of 5 tons, plus the 1500 lb trailer that’s a significant load on each wheel and sprung suspension member.  Ed Zacko helpfully provided some very detailed guidance on the Yahoo Nor’sea 27 Forum in response to my inquiry on November 30th.

Items Required:

  • some fresh 6×6 RR Ties(Home Depot) Use a chain saw to cut them to 2 ft lengths
  • a few pieces of FRESH 2×4—-1 ft lengths and 4×4’s as “shims” support at incremental levels or jack re-sets.
  • two planks—we used 2×8’s—-to spread the load over a wide area—If you dont do this the Blocks will sink into the ground —almost immediately and you may not be able to remove the jack. — also–if you are on black top over time they will also want to sink in and ruin the black top.

Warnings

  • choose a location that is not on top of submerged sewer lines, pipes, gas pipes, water Pipes etc.
  • DO NOT use Cinder Blocks or Concrete blocks for this—they will crack and fail!
  • DO NOT try to get a wheel off the ground in one go—you can put a lot of strain on the trailer and the hull—Take it easy and be patient.
  • Jack up each wheel along the axle—as close to the spring as you can get–then add the blocks and lower GENTLY

Instructions:

  • We always stored Entr’acte at 6 points. The trailer will be fine and stable and safe to store for long periods and also to work under.
  1. You will have blocks on all 4 (6) wheels.
  2. Block it up high enough so that the wheels can spin–that way you can easily remove the tires to service the brakes etc—The boat will settle over time—the planks will sink a bit and the wood will compress—especially over a long time.
     We had a few pieces of steel “I” beam that we put down first then set the RR Ties into those—but 2×8 work just as well.
  3. Add some blocks under the front of the trailer–just behind the brake actuator and also in the center of the last cross brace at the rear of the trailer—It’s amazing what can happen when one or two people go aft to do something—“Hey–hand me that sander–” and they step back to give it to you—-WATCH OUT for that.
  4. When you start to jack up you will realize just how heavy the NorSea is. You will have to go-incrementally from wheel to wheel–and remove the jack to re-set it—that’s why you have blocks of different thickness. Eventually you will get her where you want her.
  • The first time you try this it takes some time and you have to be creative with the blocks and the screw out head of the jack. Do it wrong and you can’t get it high enough to put in a block and you can’t extract the jack—Over the years I got to know the process so well that I could actually get her up in less than an hour.
  • In many ways it’s like raising your mast—you crank for a LONG time and it looks like it ain’t going anywhere—it just moves by mllimeters until you get it going
  • Throughout the jacking process be prepared for a lot of creaking and groaning as you jack and also for a lot of crackling as the wood compresses. That’s why you want to use NEW wood and not some old stuff you have lying around—also the RR Ties are quite dense compared to other wood. It’s a bit disconcerting the first time you do it.
     
    Take it easy –take it slow. Ed Zacko

2012-12-10 Line Cleaning

Beneath the mainsail, which was stored for a few years on the foredeck, the boat had several lines loose on deck. I was very skeptical about the sail’s chances.  I was surprised that the algae and moss mostly cleaned right off, but the foot area shredded open.

The lines, as ugly as they look, had better prospects. Steve at Riverbend suggested putting them in the dumpster when he saw them, but instead, I put them through the wash.  The problem with laundering anything like this (other than getting caught) is that the lines can get caught up on the washing machine’s agitator assembly and break something, or get abraded and tied in knots.

I sought to avoid this by putting them in some mesh bags, of the variety they pack oranges or potatoes in.    Unfortunately I didn’t have a need for large quantities of produce, but I remembered seeing some mesh hampers for sale at the dollar store around the corner.  I bought two of these and took out the metal stiffeners and clamps, leaving me with a large mesh bag that could accommodate a few, or perhaps 80′ of what I believe is 1/2 or 5/8″ line.

I used some plastic zip ties to close the top and put these in on the Grunge setting of the washer, which I set to extra large load and added a half cup of bleach on the Warm/Warm setting. A few minutes of agitation and the water was already black.  This was exciting!  I knew something was going to happen.

After the first cyle I looked in and already the lines were showing a great improvement.  By the spin cycle the lines were just slightly damp, and all but the 3/8″ line were very clean relative to their former state.  The mesh bag had torn, so I was just able to use the pair of bags one more time by slipping one inside the other.


The experiment was a great success.  I should be able to get at least a few years’ use out of each of these.


Stuff I Dropped in the Ocean

If you’ve been around boats for any length of time, you may be familiar with the slow motion panic that sets in whenever you drop a tool, fitting or part, only to see it go tumbling in slow motion into the ocean. It’s a very different thing than losing a screw in the carpet or grass; in a split second you go through all five stages of grief:

  1. Denial: (that did NOT just happen!)
  2. Anger (at anyone or anything) animate or inanimate.
  3. Bargaining – making promises to Poseidon involving one’s firstborn, if only that washer turns up in the cockpit, and not over the side where you know it really went
  4. Depression – and a recollection of everything you’ve ever lost in the ocean.  It’s the difference between something being misplaced or gone forever.
  5. Acceptance – by way of acceptance, here is a short list this of offerings I’ve made to Poseidon in the past crew years in roughly chronological order:
  • Stainless screwdriver. I lost this one while stripping deck hardware off my Catalina 27 in preparation for painting. It spun over the stern pulpit gracefully and disappeared. Sadly it was not one of those nifty floating types.   Those never fall in the water!
  • Favorite Straw Hat. I lost this one while applying the new registration stickers to the side of the boat. My straw hat fell off and floated slowly away. I had time to go down and fetch a boat hook and cross over to the neighboring slip, where I made frantic rowing motions as rhe wind blew the hat away to the opposite end of the marina, under sone wood pilings by the sea wall  made
  • A bronze bushing from a Barient winch. I was being very careful not to lise any parts from the underside of the winch, when i turned it over just in time to see a small bronze sleeve fall out of the top. Yep, it had to be a custom part, a bronze bushing from a discontinued manufacturer. I saw this one tumble,  in slow motion, bouncing off the gunwale and going “plop” on the ocean.  Thankfully I worked at a company that had one of the finest machine shops in the SF Bay, and I also had a second winch from which one of the machinists created an exact duplicate.
  • A brand new group 27 deep discharge lead acid battery I had just bought, set on the level gunwale and then stepped off the boat, which dipped slightly under my weight.  I turned in time to see the battery slowly sliding off and, “plop!” this one fizzed for a good ten seconds.  My diver hauled that out for me a couple weeks later.  By that time it had zero charge and white terminal posts.  I hope Walmart takes returns!

I like the think my stuff is hanging out with a bunch of other things people have dropped in the ocean, and maybe, one day, a future civilization will uncover them and come to some deeper understanding.  Maybe not.  No doubt there are a lot of other losses I’ve forgotten to note, but I am sure you get the idea. If not, your time will come!


2012-12-07 – A trip to Blue Pelican Marine

I made a trip out to Blue Pelican Marine in Alameda CA.  This is a marine consignment store run by Tom Bliss.  They recently expanded, more than doubling the square footage, and I believe he also does a fair online business with e-Bay consignments.  Blue Pelican is the kind of place you go looking for something and leaving with something else. There’s a variety of vintage nautical gear as well as lines, teak, chandlery, safety equipment, winches, books rigging and usually a couple dozen items you wouldn’t expect to find anywhere.  Prices are generally very fair.

Cockpit grate material – some shutters and 1×2 teak

I went in today looking at some material for a cockpit grate for the Nor’sea.  In picked up some type of louvered hatch and some 1x2x6′ strips that I believe I can turn into a serviceable grate that can be used to cover the cockpit. I am not sure the 1/2×2 material currently used in the slats will be rugged enough for long term use as a cockpit grate, so I thought I could beef it up with the 1×2. In any case it was $40 for the grate and $30 for the three pieces of unfinished teak, 1×2″ x 6′.


Infrared Space heater with a nice nautical wood box

I also found this cool infrared heater, which has a thermostat, LED display and a very nice wood cabinet.  It has wheels on the bottom, too.  It might fit into the area between the Nav station and the galley counter where the current stove is.  It was $49 and retails online for  around $120


Some beautiful 6-loop handrails

This pair of beautiful teak 6-loop handrails was $59.  it will need some new teak plugs and there is a chip down toward the end. I have 5- and 4- loop rails on my Nor’sea.  I have new 4-loop rails.  I’ll need to decide whether to cut these down to 5-loop or use them as-is on the Catalina 27. This was about the same price Defender charges for a single 5-loop handrail, unfinished.


This relief band is worn on the wrist and sends out a periodic electrical stimulus. Supposed to last a couple hundred hours on non-replaceable batteries.

Finally, I found this interesting anti sea-sickness device, which is designed to electronically stimulate acupressure points in the wrist.  A year ago I worked with a gentleman at Cardica, Inc. who previously was involved in marketing a similar medical device for nausea. Could it be the same thing?  It’s called the ReliefBand.  The website indicates it was discontinued and replaced by the prescription-only Reletex. It was $8, so I figured I would give it a shot This is intended for my wife, Kathy, who can get seasick on the dock. . Batteries are non-replaceable, but I may be able to find a way around that, being an electrical engineer in another life.

12-6-2012 Update – A New (old) Countertop

I picked up the blue formica I bought at at Restore yesterday using our trusty 2000 Mazda MPV van, and carried it up the 7′ ladder and down the companionway to the galley table with almost no damage – just a nick on the hidden right side edge.  I also stopped for an oil change at lunchtime.  The van had 900 miles clocked in since the last oil change – 5 years ago!  I can’t say enough good things about Savendra Dutt, the manager of SpeeDee oil change in Redwood City.  He came out personally to go over the technician’s work order and make recommendations concerning their findings. Very polite and professional.  I believe he also operates the store in Los Gatos, CA.

Back to the counter – I will need big cutouts for the sink in the center, the Origo 6000 stove/oven at right, faucet behind.  I still need to decide what to do about the icebox, either install a front loading 12V unit I have, go back to the original top loading box or try something like Greg Delezynski did – modify a Norcold cooler to fit, although he says if he had it to do over…

If I was starting from scratch now, I would NOT build it in. What I would do (no matter what) is build a shelf in the galley sized to hold one of the Norcold or Engel units on. That way, when (not if) is goes bad, or they come out with some new super unit that uses on 0.1 Amp to freez 100 Lbs of meat, you can just swap out the old unit.

Links of Interest:

The formica counter is backed essentially with particle board, so a treatment of the underside with some penetrating epoxy would also be a good idea.  I am not sure how I feel about the blue yet.  It definitely give things a vintage sort of look, which isn’t a bad way to go.  I did find some really nice looking marbled tops at Home Depot and Lowes, but I am not sure that goes well with the stainless double sink I plan to install.

I would need to install a fiddle strip across the front, or I could possibly cut it back and make the front edge entirely teak. I saw a 6′ piece at blue Pelican for $28 that would make a very nice edge and fiddle combo.

You can see I have big work ahead of me with the portlite and surrounds, which both have a lot of water damage from leaks.

This is an inexpensive, five-foot section of blue formica from Restore that I am using for the test layout of the Galley.


2012-12-05 Update – Engine work for Wednesday


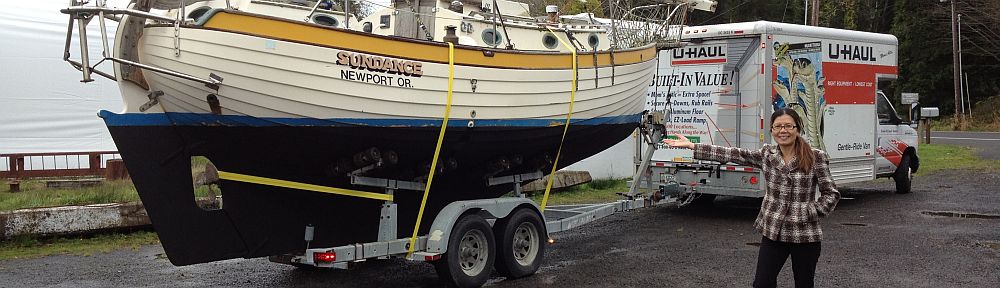
Looking forward at the Yanmar SB-8 from the aft (transmission) side. Large loop is the engine lift/throttle mount. To the right the exhaust port of the cylinder head is visible with one bolt in place to keep the oil in. In the background, a rat’s nest of wires that will need some attention.

I spent almost four hours on the motor on Wednesday.  The level of the automatic transmission fluid I was using to soak the cylinder had not dropped much, so I decided to proceed with the head removal. After much effort I was able to get the cylinder head off.  The throttle linkage mounts to the head, so that had to be removed with two large bolts.  The 1/2 drive metric sockets I picked up yesterday at Harbor Freight came in handy for this.

I was able to separate the head gasket and slowly work in a small wood shim between the head and engine.  It didn’t want to go further.  As it turns out, there was some significant rust on a pair of the studs that made the fit very difficult. It took an hour to pry the head off, working bit by bit from three sides of the engine, even though all the fasteners were removed.  I was concerned that the clearance between the top of the studs and the cylinder head, which still had the injector installed, wouldn’t give me space to remove the head because the cockpit is directly above.  Luckily it cleared by a fraction of an inch in a very particular orientation I hope I can remember if I reinstall it later.

The exhaust valve looks and operates fine, but the intake valve was siezed, and even tapping on it with a wood block did not allow it to move. The corresponding pushrod was also rusty.

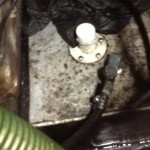
Disaster!  When I put one of the pushrods back in the engine block I must have missed the rod channel and dropped it right into one of the oil passages.  This necessitated removing the oilpan, which is held on by nine 10mm bolts.  I began by draining the sump, and was surprised to find about 8 ounces of water at the bottom of the bilge.  That pretty much explains all the problems with the engine.  The water and goey tarball oil went right into the bilge to join the diesel already there.  The pan came off fairly easily after breaking the bolts loose with a small 10mm box wrench.  The cheapie 1/4″ drive socket broke off on the first one.

Inside the bilge I found another half cup of oily goo and the errant pushrod, which had fallen straight through. I cleaned off the underside of the engine, and felt the oil pickup and the bottom of the dipstick, which is a very odd texture if you’re not expecting it… felt like a big tye wrap hanging down.  Nothing I could reach seemed rusty, though. Oil pickup tube and the bottom of the crank.  I expect the problems now are in the middle front areas, where the water and diesel pumps are.

Next, I tried to remove the water pump, but 1 of the three 10mm screws was very corroded and will require vice grips and a prayer. The others came straight out.  A project for later this week!

At this point I am expecting I will need a new engine, and the Yanmar 2GM-20F looks like a good bet.  That model is a 15HP twin-cylinder, freshwater-cooled engine.  I would benefit from both the added horsepower and the freshwater cooling, which would actually permit the use of the water heater I already have, if I can find a place for it.

a 5-foot section of blue formica I found at Restore in San Carlos for $20. A little dusty, but vaguely nautical.

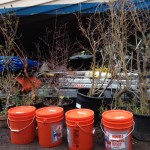
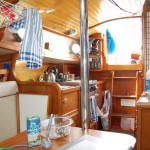
I picked up two boxes of 4″ slate tile at the restore center to evaluate for the furnace area.  I also bought a 5′ section of sea-blue formica for $20 for the galley.  I don’t know if this is the final counter, but I figured it would be best to make all my mistakes with an inexpensive piece of material (Like getting it up the ladder, through the companionway and onto the table surface isn’t an adventure in itself.)

Oh – I didn’t like that tile much.  I packed it up to return on Thursday.