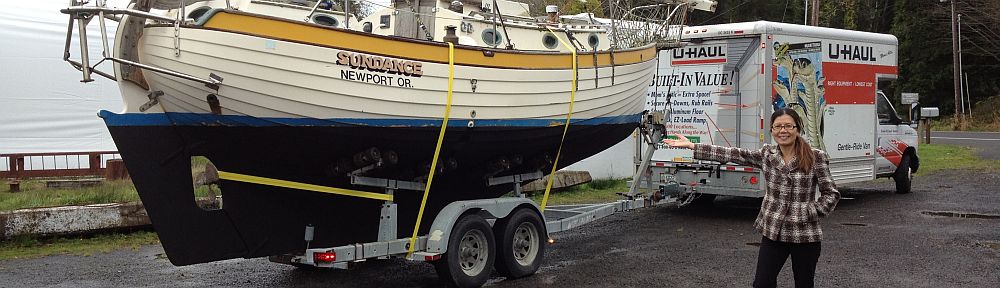
2013-01-01 engine work

Today I bought a gear puller set at Harbor Freight and successfully removed the harmonic balancer from the crankshaft. The alignment key didn’t want to come out though, but I don’t think that will interfere with the disassembly.

I found that removing the flat washer and lock washer from the pulley bolt provided access for the entire pulley to slide off over the bolt.
Next i tried to disassemble the starter shaft. I removed the 5mm machine set screw from the starter shaft, but I could not figure out how to remove the shaft itself. The manual makes it look like it unscrews, but I am not sure.
I was taking some photos of the fuel lift pump, fuel pump and water pump and accidentally dropped the washer at the bottom if the fuel pump spring into the sump. I will need to drain that tomorrow, anyway.
I opened all the ports during the day to air the boat out and closed them this evening.
I had a chance tonight to look at some of the prices for Yanmar engine parts.  Insane!  $400 pistons and $65 push rods.  $90 engine mounts. $65 for the water pump cover plate. $400 gasket sets.  $200 piston ring sets
Even if I do find the cause of this engines seizure, replacing the rings and cylinder liner would probably set me back $400 or $500, assuming the connecting rod isn’t bent.
I cleaned up a bit, removing the electrical cord, fire extinguishers, and sheet lines from the boat.  I found a nice outdoor electrical cord, 12′ long with outlets in line every 3′. I bought two.

2013-01-01 Engine Work

Pulling!

I used a gear puller set I bought at Harbor Freight to Remove the harmonic balancer.  The impact wrench I bought with the hope it might shake the crank loose had no effect, but it did a great job taking off the bolt that secures the pulley.  Then It was pretty simple to attach the gear puller behind the harmonic balancer and pull it off the shaft.  Reinstalling the bolt gave me a nice spot for the tool to push against.

Getting the water pump loose

I also worked the water pump housing free.  It was stiff and held on by mostly paint and goo.

The high pressure fuel pump was also removed.  There is a low pressure one, too.


The allen key here was used to remove the bolt. I don’t know if it secures the pin or the shaft itself!

I removed the screw that holds allen screw on the end of the crank start but could not get the pin out.  It didn’t seem to want to drift loose or unscrew.  The only reference photo I have is the black and white shop manual photo but that is from a slightly different engine.


2012-12-14 The Magic of Vice Grips

Engine Work

I did about 90 minutes’ work on the motor, using a pair of vise grip pliers to loosen the a stubborn bolt holding the water pump housing to the motor front plate. The same pliers were great for removing the water pump impeller cover screws; all but one were stripped and/or frozen. Next, I loosened the hose clamps securing the seawater plumbing and gently pried the cover off. The impeller had all its rubber vanes but there was a lot of build up on them and it was clear they weren’t moving. I was able to pry off the impeller, but the rubber piece separated from its bushing, which I removed separately. The motor still could not be turned at the crankshaft, so I will need to continue the disassembly.

I wonder if the seawater that got into the engine sump entered through the water pump, intake or exhaust ports?  The exhaust path is most logical, back from raw water burped through the water lift muffler into the exhaust port (if the engine was run with the starter without ignition), but it was the intake valve that was frozen, suggesting it was somehow involved.

I took another look at the Yanmar service manual, and see I am a good ways toward having the engine torn down. With the head already off and the intake and exhaust assemblies disconnected, it’s just the fuel pump, separator and a couple lines before the V pulley comes off, at which point it should be possible to remove the front and side covers from the engine and get a very clear view as to what has the motor siezed. I suspect at this point it is just the piston rings frozen to the cylinder walls, but worst case it could invlove the crank or camshaft. Time will tell. Then some informed decisions can be made about whether a partial rebuild or repower is most appropriate.

It will be a good project for this Saturday before I plan to do some stabilization of the trailer, and possibly pull the mast down on next Sunday.

2012-12-05 Update – Engine work for Wednesday


Looking forward at the Yanmar SB-8 from the aft (transmission) side. Large loop is the engine lift/throttle mount. To the right the exhaust port of the cylinder head is visible with one bolt in place to keep the oil in. In the background, a rat’s nest of wires that will need some attention.

I spent almost four hours on the motor on Wednesday.  The level of the automatic transmission fluid I was using to soak the cylinder had not dropped much, so I decided to proceed with the head removal. After much effort I was able to get the cylinder head off.  The throttle linkage mounts to the head, so that had to be removed with two large bolts.  The 1/2 drive metric sockets I picked up yesterday at Harbor Freight came in handy for this.

I was able to separate the head gasket and slowly work in a small wood shim between the head and engine.  It didn’t want to go further.  As it turns out, there was some significant rust on a pair of the studs that made the fit very difficult. It took an hour to pry the head off, working bit by bit from three sides of the engine, even though all the fasteners were removed.  I was concerned that the clearance between the top of the studs and the cylinder head, which still had the injector installed, wouldn’t give me space to remove the head because the cockpit is directly above.  Luckily it cleared by a fraction of an inch in a very particular orientation I hope I can remember if I reinstall it later.

The exhaust valve looks and operates fine, but the intake valve was siezed, and even tapping on it with a wood block did not allow it to move. The corresponding pushrod was also rusty.

Disaster!  When I put one of the pushrods back in the engine block I must have missed the rod channel and dropped it right into one of the oil passages.  This necessitated removing the oilpan, which is held on by nine 10mm bolts.  I began by draining the sump, and was surprised to find about 8 ounces of water at the bottom of the bilge.  That pretty much explains all the problems with the engine.  The water and goey tarball oil went right into the bilge to join the diesel already there.  The pan came off fairly easily after breaking the bolts loose with a small 10mm box wrench.  The cheapie 1/4″ drive socket broke off on the first one.

Inside the bilge I found another half cup of oily goo and the errant pushrod, which had fallen straight through. I cleaned off the underside of the engine, and felt the oil pickup and the bottom of the dipstick, which is a very odd texture if you’re not expecting it… felt like a big tye wrap hanging down.  Nothing I could reach seemed rusty, though. Oil pickup tube and the bottom of the crank.  I expect the problems now are in the middle front areas, where the water and diesel pumps are.

Next, I tried to remove the water pump, but 1 of the three 10mm screws was very corroded and will require vice grips and a prayer. The others came straight out.  A project for later this week!

At this point I am expecting I will need a new engine, and the Yanmar 2GM-20F looks like a good bet.  That model is a 15HP twin-cylinder, freshwater-cooled engine.  I would benefit from both the added horsepower and the freshwater cooling, which would actually permit the use of the water heater I already have, if I can find a place for it.

a 5-foot section of blue formica I found at Restore in San Carlos for $20. A little dusty, but vaguely nautical.

I picked up two boxes of 4″ slate tile at the restore center to evaluate for the furnace area.  I also bought a 5′ section of sea-blue formica for $20 for the galley.  I don’t know if this is the final counter, but I figured it would be best to make all my mistakes with an inexpensive piece of material (Like getting it up the ladder, through the companionway and onto the table surface isn’t an adventure in itself.)

Oh – I didn’t like that tile much.  I packed it up to return on Thursday.

2012-12-01 Tarps and Cleaning

Saturday morning

Tarps!

I replaced the large 17×20 tarp with two smaller tarps. The big one had collected so much water that I need smaller tarps to let the cockpit drains and side drains do their work.  I put a 9×12 on the main cabin, tented over the mast, and a 5×7 on the rear cabin.

Cleaning the Aft Cabin

Continuing the work of cleaning out the rear cabin I found

  • Large fisherman’s anchor and rode
  • Two danforth anchors, large and small
  • Two big Coleman coolers with broken hinges.  One has no latch.  I will probably Craigslist these for free pickup by some fisherman
  • A 1980 era VHF radio. This went straight into the trash
  • Collection of teak and cabinet door bits.  I was able to sort this out into some semblance of order. I also found one of the side stiles for the main companionway drop board.  I am still missing a piece from the main companionway door and a stile from the rear companionway drop board
  • I found the oval cutouts for the side of the engine bay
  • big square boards that go at the bottom of the footwell
  • a pair of men’s pants.  Dickies – hey my size – 34″ x 30″
  • Lots of running rigging or what may be either sheets or the mast raising kit?  I am not sure.
  • Crab traps, floats and line
  • two nautical charts
  • Zodiac raft with a repair in the bottom and a repair kit

Electrical – Getting the AC working

I used one of my camper 30A adapters to run AC into one of the two Marinco outlets on the starboard cabintop and the AC outlets in the main cabin and aft cabin now function. I have a worklight going and plugged a fan in the aft cabin to get some ventilation going in there.

Tunes

I used a gift certificate the kind folks at Cardica had given me a couple years back to buy some 6×9 speakers to install in the existing 6×9 cutouts in two of the kicker panels of the main cabin.  Melissa and I ran over to Fry’s Electronics at 8:30 just before closing and selected a pair.   I think having a stereo in there will make the work go faster.  I’ll probably put the speakers in some garbage bags to keep them dry and functional until the dust moisture and excitement die down.

I found the sump cover in the hanging locker so I pulled that out to dry.  The bottom looks pretty shot but I might be able to relaminate something so the teak pattern will match.  same story with the two cabin sole sump covers around the mast.

Scary red wire

I found a particularly scary red wire that runs down the floor of the cabin and was drilled through and under the cockpit sole then back up the other side.  I have no idea why they didn’t go through the cabinets 3′ away, but it’s perilously close to the edge of the boat.  I’ll figure out if this is still needed and relocate it.  the holes will need to be epoxy’d up… carefully!
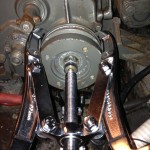
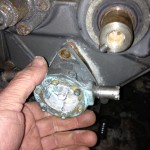
Engine work

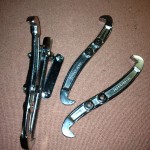
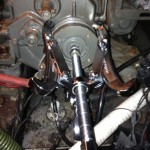
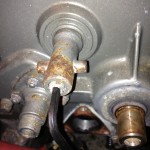
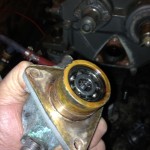
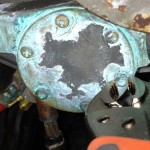
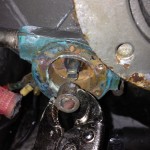
I picked up some Automatic Transmission Fluid and a battery bulb.  Juergen a mechanic who was working on an old wood boat at Coyote Point marina suggested that I fill the cylinder with ATF or diesel fuel to try to get the motor unsiezed.  I’ll try anything at this point: there is little risk! I spent almost an hour trying to find the spark plug before I remembered it was a diesel and doesn’t have one.  D’oh!  I removed the intake port and found it matched a gasket that was floating around the battery compartment, so it was nice to find a home for that.    The intake valve looked to be closed but I wiped out some rust and put about 3 tablespoons in before it overflowed.  Hours later it hadn’t gone down so I decided to have a look under the valve cover.  There is very little vertical clearance in the engine bay.  I had just enough room to remove the valve cover, if I tipped it just so.  I found the engine appears to be at the end of its exhaust stroke.  I’d have to open the other side to confirm.  I couldn’t get the intake valve to move for the life of me. The springs are tough but not that tough. I could squeeze it a bit but I couldn’t push the valve stem down any.  Nor could I convince the rocker on the other side to move.  The valve cover incorporates a decompression lever intended to let you crank start the engine, but when I looked at it it appears it presses down on the exhaust valve stem, which isn’t much help.

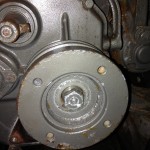
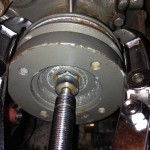
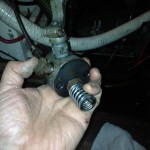
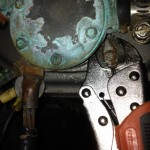
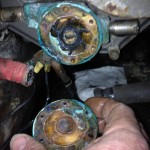
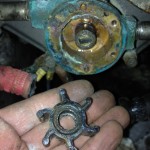
On Sunday I pulled the exhaust side.  I loosened four bolts and removed the exhaust manifold. I also had to loosen two hoses to pull away the exhaust. (It looks like there is a crack in the exhaust manifold unless it’s just a detail in the molding, but that’s a problem I am looking forward to having to deal with assuming I get the thing running.)  They’re all 13 mm bolts, about 4″ long threaded in the lower inch, and I had to dig through my tools to find a 13.  I have so many 12s and 14s it was driving me crazy!  If found a 13mm socket with a 3/8″ drive and an extension bar.  The first three came out rather easily, but the fourth was crazy hard. I had to brace myself into a knot and use my leg to push the handle of the wrench and it finally squeaked free.  I am amazed Teresa Carey was able to tear her engine down to repair a bent connecting rod by herself, but I guess mine had an additional 10 years of corrosion working against me.

The gasket had some RTV on it and when the last screw came out there was some motor oil (very dirty motor oil) coming out of the passage.  It stopped after I put the screw back in.  at least there is some oil in there!

The intake port was wide open. However, the piston is probably near Top Dead Center (TDC) so it only took a few ounces to fill it. As I pushed the exhaust manifold out of the way I heard a few cups of water come rushing out.  I don’t know if it was in the exhaust or raw water passages though.  It would explain the engine being siezed.

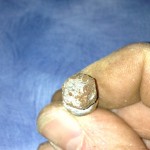
I figure there are a couple options. Either the cylinder rings rusted in the cylinder wall due to some exposure to moisture, or the motor had some more catastrophic event like a thrown valve or broken connecting rod.  I didn’t see metal flakes in the oil but I have not drained it yet.

The hope is that the oil in the cylinder will eventually creep down and lube things up enough that I can turn the main crank with a wrench.  I still haven’t been able to find the starting crank.  Juregen said it could take up to a week, so hold your breath and check back!